Kubenetes, in the home, for fun
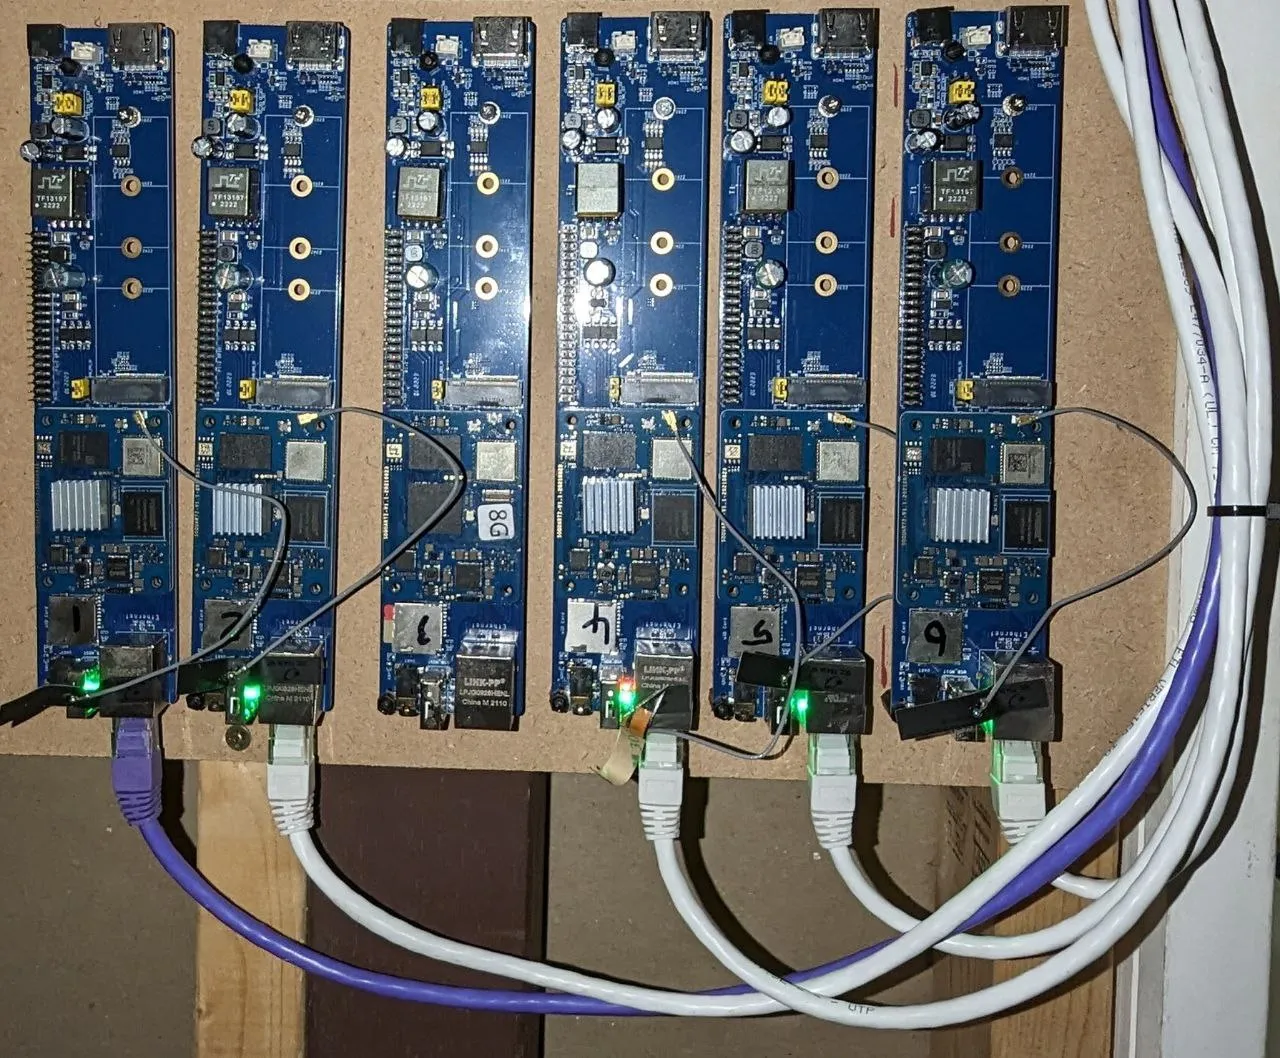
The current cluster nodes
Pine64 graciously sent me a set of the SoQuartz boards + carrier boards that are being used for this cluster (But I was not paid; they didn’t know what I would use them for). Additionally, some of the time used in first setting up the cluster was done as part of my employment at Propeller Aero.
My home lab setup has evolved a lot over the past ~10 years.
- Cheap Android TV Dongle flashed to Linux
- Cheap Intel Atom Motherboard
- HP Microserver Gen8
- ODroid N2
- Custom TrueNAS storage server
Over the last year, I’ve been running TrueNAS scale on my storage server; but with more and more programs creeping into my deployed apps, it’s time to grow into a proper setup. (I put some credit to (Awesome Self Hosted)[https://github.com/awesome-selfhosted/awesome-selfhosted] for this).
This cluster aims to be mostly a learning area as well as help keep some “critical” services like DNS up for the house.
Cluster purpose
First and foremost the desire for the cluster is to move the load off my NAS and increase availability. Occasionally the NAS needs to reboot for maintenance. Being able to have jobs shunt to a new device automatically is the key reason to run something like k8s at home. Obviously, if you only need “enough” uptime; there is no point in going to this level of effort… Unless it’s fun :).
So, if it’s not obvious; this is an at-home cluster, that is done for fun and learning. It’s not meant to be perfect but “good enough”. This means things are sometimes not what you would deploy in production. However, I like to be similar (unless it’s fun to be overkill).
Cluster design
For this cluster, I’m aiming for 2 control nodes and 3 etcd nodes, I’m overlapping these so that there are two nodes that are entirely free to just run the workload.
Node 1 -> Compute + Storage
Node 2 -> Compute + Storage
Node 3 -> Compute only
Node 4 -> Compute + etcd
Node 5 -> Controller + Compute + etcd + Storage
Node 6 -> Controller + Compute + etcd + Storage
Once the rough cluster plan has been shaken out; it’s time to prepare the nodes and deploy a rough and ready k8s cluster.
Deploying an OS to the nodes
The largest issue I ran into in deploying this cluster is that DietPi is missing a lot of the required kernel modules for K8s to run on the nodes, and Kubespray doesn’t support Arch/Manjaro (I could totally have deployed it all manually… Just effort).
Thankfully just as I was dreading having to build my own image I stumbled upon the apparently-not-quite-ready-but-already-shockingly-good Plebian Linux Project by CounterPillow and friends. This is a really good project and mega kudos to them. After writing the image to the eMMC modules for each cluster unit; the units came up perfectly and we are away to the races.
I highly suggest doing a brief bit of locking down first here:
- Setup ssh keys
- Disable password login
- Disable root login
- cleanup installed packages
Also, I find this a good point in time to lock in the local IPs for the nodes to make sure they can’t move around. The only thing worse than physically losing an SBC is having to find the darn things new IP.
Kubepsray
For the vast majority of the use of kubespray, please refer to their guide. This post is a snapshot in time, so will age fast. Also, I’m certain I’ll miss little things.
Hyper short TL;DR
- Download kubespray
- Install dependencies for kubespray
- Copy the template somewhere for working
cp ../kubespray/sample/* src/cluster/ - Generate your inventory
declare -a IPS=(192.168.0.200 192.168.0.201...); CONFIG_FILE=inventory/prod/hosts.yml python3 contrib/inventory_builder/inventory.py ${IPS[@]} - edit addons.yml for metallb to be enabled and assign IP
- Set
strict_arptotruefor metallb - Set upstream DNS fields:
upstream_dns_servers - Turn on NTP on all nodes:
ntp_enabled: true - Run deployment
cd ../kubespray && ansible-playbook -i ../src/cluster/hosts.yaml --become --become-user=root cluster.yml -kK - kubectl should work on the nodes; copy the cube config to your machine to use locally
Prepare
I don’t like to infect or pollute my computer with random software or mixed versions; I’m running kubespray in a docker pod.
This means that I can match perfectly to what software it wants without any risks.
I’ve pushed the Dockerfile + docker-compose.yml to my GitHub, for reference. You are welcome to use this.
Create the inventory of nodes
Kubespray wants to have a hosts.yml file that is used to define each machine it’s going to configure and its roles. For example, this is what mine worked out to be:
all:
  hosts:
    node1:
      ansible_host: 192.168.0.201
      ip: 192.168.0.201
      access_ip: 192.168.0.201
    node2:
      ansible_host: 192.168.0.202
      ip: 192.168.0.202
      access_ip: 192.168.0.202
    node3:
      ansible_host: 192.168.0.203
      ip: 192.168.0.203
      access_ip: 192.168.0.203
    node4:
      ansible_host: 192.168.0.204
      ip: 192.168.0.204
      access_ip: 192.168.0.204
    node5:
      ansible_host: 192.168.0.205
      ip: 192.168.0.205
      access_ip: 192.168.0.205
    node6:
      ansible_host: 192.168.0.206
      ip: 192.168.0.206
      access_ip: 192.168.0.206
  children:
    kube_control_plane:
      hosts:
        node6:
        node5:
    kube_node:
      hosts:
        node1:
        node2:
        node3:
        node4:
        node5:
        node6:
    etcd:
      hosts:
        node4:
        node5:
        node6:
    k8s_cluster:
      children:
        kube_control_plane:
        kube_node:
    calico_rr:
      hosts: {}
Above you can see that I used a fairly simple static IP assignment to keep things easy to remember. When I magically run out of the ~55 node IP’s I might need to be creative… But that’s a lot of $$ worth of SBC’s to buy first.
This should match the plan you made earlier on; since this is exactly what Kubespray will deploy.
Edit kubespray settings
I changed some settings away from the defaults to have kubespray set up more of my cluster for me.
First copy the cluster defaults out of the kubespray repo so that you have something to edit. Then you can edit these outside of docker.
cp -r inventory/sample ../src/
Network Plugin
For this cluster, I’ve settled on using flannel for the network management plugin. For no good reason other than (1) it just worked and (2) it sounded good in online reviews. The default calico also worked fairly well in testing too; so I think either of these should serve you well in your deployment if you do one.
Modify required packages
As of the time of writing, kubespray is designed around older Debian releases, so it expects python-apt to exist rather than the newer python3-apt.
For now, I’m manually patching roles/kubernetes/preinstall/vars/debian.yml to enact the name change of the package. (See my docker file).
Also if you want to have ansible automatically install extra packages for you, insert them here.
MetalLB
MetalLB is a fantastic load balancer so far for me, does exactly what I want on bare-metal machines (provides resiliency) without any extra hardware. It handles this by using ARP to advertise what node is hosting the LAN IP for the service, this way if the node goes down, it can move it as needed.
For MetalLB to function, you need to tell it what IP space in your network it can assign to services.
For my home network, I run in 192.168.0.0/23. This gives me 192.168.0.0-192.168.0.255 for devices and then I use 192.168.1.0-192.168.1.255 for services and IO~~S~~T devices.
The main DHCP server only allocates the devices range, and anything in the services range is outside its control.
Thus when configuring MetalLB, I’ve given it 192.168.1.10-192.168.1.128. This is plenty of room for a home lab :).
I needed to set kube_proxy_strict_arp to true as well for this to work in my configuration.
Deploy against the nodes
ansible-playbook -i ../src/cluster/hosts.yaml --become --become-user=root cluster.yml -kK
That’s the magic command I used. But to expand this, I’m locating my hosts and config files in a folder outside the kubespray directory.
This is done so that they can be checked into git and preserved across restarts of my docker environment.
--become --become-user means that after Ansible logs into the device it will elevate to that user.
I use this to raise to root to perform the setup so that the initial ssh does not need the ability to log in as the root user.
Persist your configuration for accessing the cluster
After ansible has deployed the changes to all of your nodes, the cluster configuration file for access will be placed in the cluster/artifacts/admin.conf file.
Copy this to your ~/.kube/ folder and tools like OpenLens will pick it up automatically.
If you save this as default in your Kube folder it will be used automatically, otherwise, when interacting with the cluster from the CLI you will need to specify the file by setting KUBECONFIG => export KUBECONFIG=/home/$USER/.kube/admin.conf
Setting up LAN-accessible services
For a lot of the services I plan to run on the cluster; it’s optimal for them to be assigned a static IP so that I can reliably find them. NodePorts are a volatile solution (unless you have 1 node) since the port will be exposed on a node but there is no knowing which until it’s assigned by k8s.
The first service I deployed to the cluster was blocky which is a great tool to have on one’s home network. Many have probably heard of Pi-Hole, and blocky feels like the juiced-up and streamlined pi-hole. It acts as my primary DNS at home and catches all the DNS requests from client devices.
Setting up Blocky is a relatively straightforward affair:
- Create a configuration file (or a close best guess)
- Inject the configuration file into a k8s config-map
- Create the deployment to define the redundant pods
- Create an ingress to have MetalLB assign a static IP to the pods
Blocky has a relatively simple configuration that we can store inside of k8s to allow the pods to run without any special volume mounts. During pod creation, the file will be injected into their containers from our config map. Personally I find this a hard requirement, I don’t want to bring the cluster up from a cold start to involve loops. So having a dependency on storage systems to get my DNS up feels like a fast way to circular dependency hell. Instead by using the in-k8s stored config, I only need the usual k8s requirements of a controller and etcd.
Create the configuration file
Please refer to the blocky documentation when creating your config, but a minimised one is thus:
upstream:
  default:
    - 1.1.1.1
    - 8.8.8.8

startVerifyUpstream: true

blocking:
  blackLists:
    ads:
      - https://raw.githubusercontent.com/StevenBlack/hosts/master/hosts
  whiteLists:
    ads:
      - |
        fonts.gstatic.com
  clientGroupsBlock:
    default:
      - ads

  blockType: zeroIp
  blockTTL: 5m
  startStrategy: failOnError

prometheus:
  enable: true
  path: /metrics
This is a barebones configuration for brevity. This has one block list, and 2 upstream DNS servers and also enables the prometheus metrics.
Save this to a yaml file on disk such as blocky-configuration.yml.
We can then create a configmap via kubectl kubectl create configmap blocky-config --from-file=blocky-configuration.yml
Create the main deployment
Before I jump into the deployment, a quick note is that you can have multiple blocks in one yaml file.
If you append the sections together with a --- line that will split up each section.
This means a single yaml file can contain your entire deployment.
Also, remember that you “apply” a yaml file with kubectl apply -f <path>. Or you can apply a whole folder of yaml files at once if that path is a directory.
To run Blocky we want to maintain good uptime so we want to instruct the cluster to always try and keep two copies running at once. This way if one fails, MetalLB can migrate the IP as soon as possible to a ready-to-go pod. This also means that upgrades will roll out across the pods one by one, preventing downtime where possible.
Here is the deployment I’m running at the moment, I’ve annotated the lines with comments to make more sense
apiVersion: apps/v1
kind: Deployment
metadata:
  name: blocky #Name for human interaction and used in the base pod labels
  labels:
    app: blocky
spec:
  replicas: 2 # We want to keep 2 replicas (copies) running at all times
  selector:
    matchLabels:
      app: blocky
  template: # This is the template that is used when spawning each replica
    metadata:
      labels:
        app: blocky
        name: blocky
    spec:
      containers: #The list of containers to run in the "pod"
        - name: blocky
          image: spx01/blocky:v0.20 # Pull the latest image tag when starting. _Ideally_ you may want to tag this instead.
          imagePullPolicy: IfNotPresent # But only do that download if we don't already have on on the machine
          env:
            - name: TZ
              value: "Australia/Sydney" # Force the timezone to be local in the pod
            - name: BLOCKY_CONFIG_FILE
              value: "/app/config/blocky-configuration.yml" # The path blocky should read to grab its config
          volumeMounts:
            - name: blocky-configuration # This volume mount specifies that we want the volume (declared later) to be mounted in the folder blocky wants
              mountPath: /app/config/ #
          resources:
            requests: # Requests help k8s guess how much it needs when packing a node with jobs, here we declare 0.1 CPU's (10% of one core)
              cpu: "0.1"
            limits:
              cpu: "2" # This is a limit, if the process is using more than this it will be limited at this if the node is busy
          readinessProbe: # This probe (polling the TCP DNS socket) is used to allow K8s to know when the pod is up and ready to handle traffic
            tcpSocket:
              port: 53
            initialDelaySeconds: 20
            periodSeconds: 10
          livenessProbe: # This probe (polling the TCP DNS socket) is polled periodically for K8S to make sure the pod is still alive and happy
            tcpSocket:
              port: 53
            initialDelaySeconds: 60
            periodSeconds: 10

      volumes:
        - name: blocky-configuration # We define the volume we mounted above
          configMap: # And specify it comes from a configmap in k8s
            name: blocky-configuration
Once this is applied to the cluster, you can inspect the pods in OpenLens and see that they will move through to the ready state (It may take a bit at first while the image is pulled).
Where possible I also try to include a PodDistruptionBudget. This is a fancy way of describing to k8s to always keep 1 available at all times. This means that when you make a change it will bring down all but one, change them, let them come up and take the load than do the remaining one.
Doing this will make deployments slower, but it means you should minimise interruptions.
Reminder: As noted earlier on, you can put this in the same deployment separated by a ---.
apiVersion: policy/v1
kind: PodDisruptionBudget
metadata:
  name: blocky-pdb
spec:
  minAvailable: 1
  selector:
    matchLabels:
      app: blocky
Create an ingress to assign a static IP
To expose blocky to the network we are going to define a service for it with an exposed endpoint. Also since I need t obe able to configure the static IP to be advertised by DHCP, here I’m pinning it to 192.168.1.10. This is the start of the MetalLB range so MetalLb will happily allocate this for us.
apiVersion: v1
kind: Service
metadata:
  name: blocky
spec:
  type: LoadBalancer
  loadBalancerIP: 192.168.1.10
  selector:
    app: blocky # Find the app called blocky to attach to
  ports:
    - port: 4000
      targetPort: 4000
      protocol: TCP
      name: blocky-admin # port we expose the admin interface/API and the Prometheus metrics
    - port: 53
      targetPort: 53 # Open up port 53 TCP and UDP for queries
      protocol: TCP
      name: dns-tcp
    - port: 53
      targetPort: 53
      protocol: UDP
      name: dns-udp
Ingress with nginx-proxy & cert-manager
To create nicer applications that are public internet facing; it’s optimal to give them an HTTPS cert to make things both faster and more secure. To achieve this we also want to (1) automate everything and (2) have load balancing so that more than one pod can take the load at once where possible. I have moderately decent home internet so exposing services over it runs quite well. Normally I don’t expose things and instead, use Tailscale to route things privately. But some services I want others to be able to reach such as a hosted Git server. It’s for these shared resources we want to set this up.
Nginx-proxy
This deployment uses Nginx to act as a load balancer and reverse proxy. It will look at the hostname on the incoming request and match it against all of the selectors for applications we have defined. This means we can use as many subdomains and have them spin out to multiple services with only one public IP.
Additionally, Nginx will terminate TLS for us, using the certificate that cert-manager stores in the cluster. This means that our services do not have to use HTTPS (or can use a cluster-trusted self-signed cert), and Nginx will handle the load of wrapping the connection in the TLS connection. Again, it’s magic.
For setting up nginx I’ve just used their deployment directly kubectl apply -f https://raw.githubusercontent.com/kubernetes/ingress-nginx/controller-v1.5.1/deploy/static/provider/cloud/deploy.yaml and this has worked excellently so far.
Cert-manager
Cert manager handles the magic API requests to pass certification and generation of a Lets Encrypt certificate.
Whenever a service is defined that has a public domain name, the cert-manager will fetch the certificate from Lets Encrypt and store it in k8s ready for Nginx to use.
Similarly to nignx; I am deploying cert-manager directly via kubectl apply -f https://github.com/jetstack/cert-manager/releases/download/v1.10.1/cert-manager.yaml
Additionally; once cert-manager itself is deployed; it needs to be given a configuration to tell it where to fetch certs from:
apiVersion: cert-manager.io/v1
kind: ClusterIssuer
metadata:
  name: letsencrypt-prod
  namespace: cert-manager
spec:
  acme:
    server: https://acme-v02.api.letsencrypt.org/directory
    email: <your email here>
    privateKeySecretRef:
      name: letsencrypt
    solvers:
      - http01:
          ingress:
            class: nginx
In this case; it’s a ClusterIssuer so it will be able to issue certificates for the whole cluster.
Finally; for each subdomain we want to associate with a service; we add a configuration for it as well like so:
apiVersion: cert-manager.io/v1
kind: Certificate
metadata:
  name: gitea-cert
  namespace: gitea
spec:
  dnsNames:
    - gitea-example.ralimtek.com
  secretName: gitea-tls-cert
  issuerRef:
    name: letsencrypt-prod
    kind: ClusterIssuer
You can then apply this configuration to the cluster as well, and it will be picked up automatically for you :)
Noting that you will need to make the service for this to work (otherwise it will complain that it can’t find the service you are referring to).
Tada
So at this point; in theory, you have a running cluster of nodes; and you have one working service + automatic TLS setup for your future deployments.
FAQ / Help
Reset cluster and try again
Once the power of reproducible deployments goes to your head becomes familiar; you will most likely want to try changing settings and testing different configurations.
To do a full node reset that takes down all of the cluster and software you want to use the reset workflow (command ansible-playbook -i ../src/cluster/hosts.yaml --become --become-user=root reset.yml -kK).
This will take you roughly back to before you started. It does leave crud on the filesystem as ansible makes file backups every time you run things, but that’s minor for a home lab and for testing.
Trying to reset and DNS lookup is broken
If you are trying to reset the cluster because you broke networking (because you may or may not have been changing network settings…), you may run into getting stuck as the DNS lookups timeout/fail because resolvectl is still configured to use the k8s nodedns service as the resolver, but that service is down due to your testing.
This is relatively easy to fix, generally, ansible inserts a block at the top of the /etc/dhcp/dhcpclient.conf file that inserts this override. You can just remove the lines between the two comment markers for the ansible content and reboot to get out of this situation.